> For the complete documentation index, see [llms.txt](https://support.4cast.world/llms.txt). Markdown versions of documentation pages are available by appending `.md` to page URLs; this page is available as [Markdown](https://support.4cast.world/4.-timecode-setup/the-timeline-editor.md).
# The Timeline Editor
The MVP includes a built-in NLE-style timeline for arranging video and lighting clips against a 24-hour SMPTE timecode range. This is where you build and edit your timecode-driven shows.
***
## Page Layout
The Timecode page is divided into several areas:
| Area | Location | Purpose |
| -------------------- | -------------- | ----------------------------------------------------------- |
| **Header** | Top | Slot selector, frame rate, edit mode |
| **Timeline Toolbar** | Above timeline | Save button, timecode status chips, SMPTE display |
| **Media Library** | Left column | Video and lighting clips available to place on the timeline |
| **Timeline** | Right column | Two-track editor with hour overview, ruler, and clip lanes |
| **Inspector** | Bottom strip | Properties and controls for the selected clip |
***
### Slot Selector (A-E)
Click the slot name in the header to expand the slot selector. Five independent timeline slots are listed. Click any slot to switch. **Timecode slot switches sync to playback immediately** -- there is no separate "Sync Changes" step.
If you have unsaved changes on the current slot, they are **saved automatically** before switching.
You can rename slots by clicking the pencil icon (up to 30 characters, letters, numbers, spaces, underscores, dashes, dots, parentheses, and ampersand).
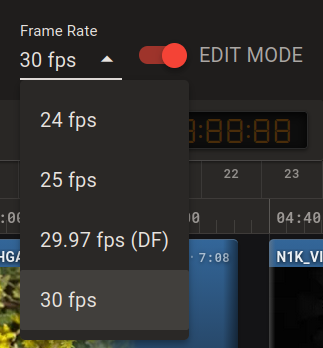
### Frame Rate
Select the frame rate that matches your timecode source:
| Option | Value |
| -------------- | ----- |
| 24 fps | 24 |
| 25 fps | 25 |
| 29.97 fps (DF) | 29.97 |
| 30 fps | 30 |
If the incoming timecode frame rate doesn't match your selection, an amber **"Framerate Mismatch"** warning chip appears in the timeline toolbar.
### Edit Mode
Toggle **EDIT MODE** to enable timeline editing. When off, the timeline is read-only -- you can view and monitor but not make changes.
***
## Timeline Toolbar
#### Snap (Magnet) Toggle
The **magnet** icon in the header toggles magnetic snapping. When on, dragged clip edges and the playhead snap to nearby targets within \~8 px (zoom-independent):
1. Playhead
2. Other clip edges (both tracks)
3. Grid major ticks (the labeled ruler ticks)
4. Grid minor ticks (the unlabeled fine ticks)
5. Frame boundary -- always on, even when the magnet is off
The snap state is **persisted** across sessions. Press **S** to toggle from the keyboard, or hold **Alt** during a drag to temporarily bypass snap (the frame-floor remains in effect). When a snap engages during a drag, a colored guideline appears at the snap point.
#### Keyboard Shortcuts Cheat Sheet
The **keyboard** icon in the header opens an in-app reference of every shortcut. Press **?** or **F1** anywhere on the page to open the same dialog.
### Timecode Status
Real-time status indicators (only visible when timecode signal is present):
| Element | Meaning |
| ----------------------------------------------------- | ------------------------------------------------------ |
| **"ACTIVE . LTC"** or **"ACTIVE . MTC"** (green chip) | Timecode signal is being received, with source and FPS |
| **Framerate Mismatch** (red pulsing chip) | Detected FPS differs from your configured FPS |
| **Speed** (e.g., "1.000x") | Playback rate of the timecode source |
### SMPTE Timecode Display
A large **HH:MM:SS:FF** display in 7-segment LCD style (DSEG7 font) with a ghost-digit effect (classic LED clock appearance). Shows the current playhead position in real time.
### Save Changes Button
Click **SAVE CHANGES** to persist your timeline arrangement to the device. This button only appears when you have unsaved edits. Saving automatically syncs the configuration to the playback engine.
If you navigate away with unsaved edits, you'll be prompted to **Save & Leave** or **Discard & Leave**.
***
## Media Library
The left column lists all available Videos and DMX Clips that can be placed on the timeline, in two collapsible sections.
### Videos
Each video shows:
* **Thumbnail**
* **Filename**
* **Duration**
* **All-Intra badge**:
* Green checkmark: All-Intra encoded (ready for timeline use)
* Amber warning: Not All-Intra (conversion will be required when placed on the timeline)
* Image icon: Still image (no conversion needed)
Click a video file to view its detailed info in the Video Info Dialog.
### Lighting Clips
Each DMX clip shows:
* **Clip name**
* **Duration**
* **DMX badge** (amber gradient thumbnail)
* A fixed **BLACKOUT** entry is always listed first (sets all channels to zero)
### Adding Clips to the Timeline
**Drag** a file from the Media Library and **drop** it onto the appropriate track lane (Video or Lighting). The clip will be placed at the drop position. Dragging requires Edit Mode to be enabled.
* If you drop onto an existing clip, the new clip is placed before or after it based on your drop position.
* Clips cannot overlap on the same track.
* **Video clips require All-Intra encoding.** When you drop a non-All-Intra video, the MVP will prompt you to convert it. If you cancel the conversion, the clip is removed from the timeline. See [All-Intra Video & Timecode Sync](/4.-timecode-setup/all-intra-videos.md) for details.
* All-Intra video clips that have not been analyzed yet will prompt for a quick video analysis (10-20 seconds). Cancelling removes the clip.
***
## Timeline Editor
### Hour Overview Bar
The bar at the top spans the full 24-hour range (hours 00-23). It serves as both a navigation tool and a minimap:
* **Minimap**: Tiny colored bars within each hour cell show where clips exist (blue = video, amber = lighting).
* **Viewport rectangle**: Shows which portion of the 24-hour range is currently visible.
* **Drag** the rectangle body to pan the view.
* **Drag the left or right edge** to zoom in or out.
* **Click** an hour cell to jump the view to that hour (default 1-hour viewport width).
### SMPTE Ruler
The ruler displays timecode labels that adapt to your zoom level. Tick intervals follow SMPTE-friendly values.
A **red playhead line** on the ruler shows the current timecode position.
### Track Lanes
Two horizontal tracks:
| Track | Color |
| ------------ | ----- |
| **VIDEO** | Blue |
| **LIGHTING** | Amber |
### Clips on the Timeline
Each clip appears as a colored block:
* **Label bar** (top): Clip name and duration. Video clips that are not All-Intra show an amber warning icon with tooltip.
* **Thumbnail** (video) or **DMX badge** (lighting): Visual identifier below the label.
* **Trim indicators** (bottom corners): Show trim-start and trim-end amounts when the clip has been trimmed.
* **Resize handles**: Left and right edge handles for trimming appear on hover or when selected.
* **Selection highlight**: Selected clip gets a white border.
#### Timeline Interactions
All editing requires **Edit Mode** to be enabled.
| Action | How |
| -------------------- | ----------------------------------------------------------------------------------------------------------------------------------------------------- |
| **Add a clip** | Drag from the Media Library onto a track |
| **Select a clip** | Click it (populates the Inspector) |
| **Move a clip** | Drag horizontally |
| **Nudge a clip** | Arrow keys: **←/→** = 1 frame, **Shift+←/→** = grid minor step, **Ctrl/Cmd+←/→** = grid major step |
| **Duplicate a clip** | **Ctrl/Cmd+D**, or click **Duplicate** in the Inspector. The copy is placed flush after the original, so repeated presses chain into a seamless loop. |
| **Trim clip start** | Drag the left edge handle, or type / scroll on the Trim Start field in the Inspector |
| **Trim clip end** | Drag the right edge handle, or type / scroll on the Trim End field in the Inspector |
| **Remove a clip** | Select it and press **Delete** or **Backspace**, or click "Remove Clip" in the Inspector |
| **Deselect** | Click empty space on the timeline, or press **Escape** |
| **Pan the view** | Mouse wheel, two-finger trackpad scroll, or click-and-drag empty space |
| **Zoom** | **Ctrl/Cmd/Shift + wheel** on a mouse, or **pinch** on a trackpad. Anchored at cursor. Range: 1 s -- 24 h. |
| **Scrub** | Hover to see a white line with SMPTE position |
| **Toggle snap** | **S** (or click the magnet icon in the header) |
| **Bypass snap** | Hold **Alt** while dragging |
| **Open shortcuts** | **?** or **F1** (also a keyboard icon in the header) |
All positions are snapped to the nearest SMPTE frame boundary. While dragging a clip, a tooltip at the leading edge shows the SMPTE start time, and any active snap target is highlighted with a colored guideline.
> The wheel/trackpad mapping mirrors industry standards (Premiere, Resolve, Final Cut, Logic, Reaper). On a notched mouse, plain wheel = pan, modified wheel = zoom. On a trackpad, two-finger scroll = pan, pinch = zoom -- exactly as in any modern NLE/DAW.
***
## Inspector
The Inspector appears below the timeline when a clip is selected.
### Empty State
When no clip is selected: *"Select a clip on the timeline."*
### Clip Selected
**Row 1 -- Identity:**
* Clip name
* Track type (Video or Lighting)
* Full file duration in SMPTE format
* **Duplicate** button (primary, requires Edit Mode) -- places a copy flush after the original
* **Remove Clip** button (red, requires Edit Mode)
**Row 2 -- Timing:**
* **Start Position**: Editable SMPTE field -- see Editing Timecode Fields below
* **Duration**: Read-only (calculated from start to end)
* **End Position**: Read-only
**Row 3 -- Trimming:**
* **Trim Start**: Editable SMPTE field showing the file offset. Type a value, scroll, or use the same smart-parser shortcuts.
* **Trim End**: Editable SMPTE field showing the end trim. Same conventions as Trim Start.
* A **"Trimmed"** chip (amber, with scissors icon) appears when either trim value is greater than zero.
**Editing Timecode Fields**
All three SMPTE fields (Start Position, Trim Start, Trim End) follow the same professional NLE/DAW conventions:
* **Click** the field -- the entire value is selected; your first keystroke replaces it.
* **Enter** or **Tab** commits your typed value. **Esc** cancels and reverts.
* If the value is invalid (parse error, out of range, or it would collide with another clip), the field flashes red briefly and reverts -- no modal interruption.
* Mouse wheel still nudges by one frame per click. Trackpad two-finger scroll nudges smoothly (one frame per \~50 px).
The smart parser accepts several formats:
| You type | Interpreted as |
| ------------- | -------------------------------------------------------- |
| `01:23:45:10` | Full SMPTE -- 1 h 23 m 45 s 10 f |
| `5:00` | 5 seconds, 0 frames (rightmost group is always frames) |
| `:15` | 15 frames |
| `5300` | `00:00:53:00` (digits right-fill into HH:MM:SS:FF pairs) |
| `+1:00` | Advance the current value by 1 second |
| `-:15` | Retreat the current value by 15 frames |
Values are always quantised to the nearest frame boundary on commit.
### All-Intra Status (Video Clips Only)
An additional row for video clips shows the encoding status. All-Intra is **required** for the timeline -- non-All-Intra clips must be converted before they can be used for timecode playback.
| Status | Display | Action |
| ---------------------------- | ------------------------------------------------------ | ---------------------------------------- |
| **All-Intra** | Green chip: "Frame-accurate seeking enabled" | None needed |
| **Not All-Intra** | Amber chip: "Convert for frame-accurate timecode sync" | **"Convert to All-Intra"** button |
| **Converted version exists** | Amber chip + "Already converted" | **"Switch to All-Intra"** button (green) |
| **Conversion in progress** | Progress circular with percentage | Wait for completion |
| **Queued** | "Queued for All-Intra Conversion" | Wait |
| **Analyzing** | Spinner: "Analyzing Video..." | One-time video analysis in progress |
A help button opens the All-Intra explanation dialog.
> *For details on All-Intra encoding and the conversion process:* [*All-Intra Video & Timecode Sync*](/4.-timecode-setup/all-intra-videos.md)
***
## Timeline Playback Behavior
When timecode is active, the timeline responds in real time:
* The **red playhead** tracks the incoming timecode position, auto-scrolling the viewport to keep it in view
* The **timecode status chips** update to show signal state, source, FPS, and speed
* If timecode enters a clip range, the MVP plays that clip
* If timecode leaves all clip ranges, video goes to blackout and lighting holds its last state
* If the timecode source changes speed (e.g., CDJ pitch), the MVP adjusts its playback rate to keep perfect sync
***
## Video Analysis
If your videos are already All-Intra, when you first place the video clip on the timeline, the MVP prompts you to run a **one-time video analysis**. This ensures frame-accurate playback with timecode.
* Takes approximately 10-20 seconds per file
* Video playback is temporarily disabled during analysis
* Only happens once per file
* If you cancel, the clip is removed from the timeline
* If analysis fails, the clip is removed and a notification prompts you to try again
***
## Tips
* **All videos must be All-Intra** for the timeline. Convert before uploading for the fastest workflow, especially for 4K content. See [Exporting All-Intra from Editing Software](/4.-timecode-setup/exporting-all-intra-from-editing-software.md).
* **Use the Hour Overview** to quickly navigate a long show timeline instead of scrolling manually.
* **Mouse wheel on timing fields** in the Inspector is the fastest way to make fine adjustments (one frame per scroll tick).
* **Timecode saves auto-sync** -- unlike Video and Lighting pages, there is no separate "Sync Changes to Playback" step.
* **Save frequently** -- the navigation guard will catch you if you forget, but it's good practice.
* **Loop a clip the fast way**: select it and press **Ctrl/Cmd+D** repeatedly. Each press appends another copy flush against the previous one -- ideal for hold frames and repeated DMX cues.
* **Type, don't drag, for precision**: click any timecode field in the Inspector, type `+:15` to nudge forward 15 frames, or `1:00:00:00` to jump to exactly one hour.
* **Hold Alt while dragging** to temporarily bypass snap when you need to land between snap targets.
* **Press ?** any time to see every keyboard shortcut without leaving the page.
***
## Related Pages
* [Timecode Overview](/4.-timecode-setup/timecode-overview.md) -- Understanding LTC, MTC, and sync capabilities
* [All-Intra Video & Timecode Sync](/4.-timecode-setup/all-intra-videos.md) -- Why All-Intra is required and how conversion works
* [Exporting All-Intra from Editing Software](/4.-timecode-setup/exporting-all-intra-from-editing-software.md) -- Premiere, FCP, Resolve, Handbrake guides
* [LTC (Audio Timecode) Setup](/4.-timecode-setup/ltc-audio-timecode-setup.md) -- Hardware setup for audio timecode
* [MTC (MIDI Timecode) Setup](/4.-timecode-setup/mtc-midi-timecode-setup.md) -- MIDI timecode and transport control
* [Configuration Slots (A-E)](/6.-configuration/configuration-slots.md) -- Multi-slot system explained